Announcing the Essbase Ribbon, Part 2 – Power Adhoc Ribbon

Many of you used the Essbase ribbon I built 10+ years ago. I have been asked by many to build a similar ribbon for Smart View. Today I am introducing the Power Adhoc Ribbon. It has all the bells and whistles of the old ribbon completely re-engineered for Smart View. There is a nominal fee, but you can try it for free. Some of the awesome features are summarized below.

The Power Adhoc Ribbon has it’s own website where you can get updates, download the most recent version, and read more about what the options and future enhancements. Head over to the Power Adhoc website for all the details.

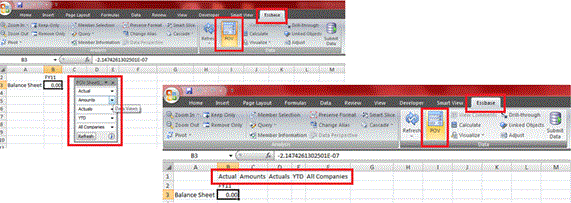
  • Refreshing worksheets is the cornerstone of any adhoc reporting. We put refresh on steroids. You can refresh the worksheet or all the worksheets in the workbook, but we added even more. The ribbon has two other options that let you refresh with suppression on or off, without changing your Smart View settings.
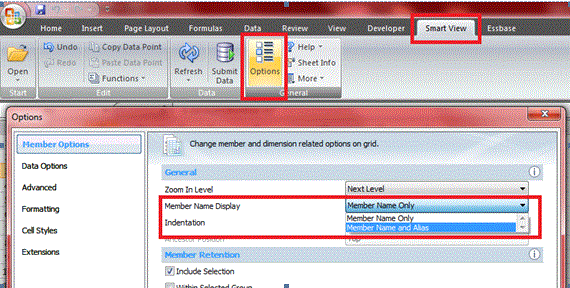
  • We know you change your aliases all the time. Now it sits on the ribbon to toggle it on the fly. Change between no aliases and the default aliases whenever you want, quickly and efficiently.
  • The ribbon also includes quick options to change your aliases between default and none. It doesn’t stop there. You can also toggle your formatting between Excel and Cell Styles.
  • Now, all your most commonly edited worksheet settings are on the ribbon, including zoom, suppression, and retention. When you change worksheets, the ribbon automatically updates to reflect the current worksheet settings.
  • What do you do when you want to distribute those workbooks with Smart View functions? Zap will remove all the functions in your worksheet or workbook with the values they return and leave any Excel formulas.
  • How many times have you wanted to duplicate a worksheet and been frustrated because it doesn’t copy your settings and connection? That is now a thing of the past. The worksheet duplicator will copy any worksheet and include the connection and worksheet settings.
  • The Power Adhoc ribbon adds a complete template management vehicle. Commonly used worksheets can be saved in groupings and reused at a later time by opening them right from the ribbon. Group them by application, purpose, or however you want. Templates can be starter adhocs or standard reports. You manage your templates and how they are organized. Your templates can be renamed, reorganized, or removed at any time.
  • Power Options allows you to show/hide the options you want. You no longer need to see the options that aren’t relevant to you.
  • Because you maintain your subscription, we can easily let you know when updates are released.  As soon as any improvements are available, you will be the first to know.
  • Not everything on the ribbon will be new to you. To reduce the need to toggle between ribbons, the most commonly used options from Smart View are included.
  • To reduce the learning curve, every option has a power tooltip that explains its purpose.
  • By having a subscription, you get all the updates and you decide what enhancements are prioritized. If there is an enhancement you need, ask for it.
  • Many operations, like refreshing and submitting, can sometimes take longer than you expect. Just to make sure you can monitor those requests, we notify you how long it took by updating Excel Status Bar.


Adventures in Groovy – Part 8: Customizing Data Maps and Smart Pushes

Introduction

Groovy has the ability to execute Data Maps and Smart Pushes.  Data Maps are objects that define the data movement between applications and are accessible globally.  Smart Pushes are Data Maps that are attached to a Data Form and can override the dimensions settings.  They are largely the same thing, but defined separately inside of PBCS.

So, why execute these in Groovy rather than assign to a form and call it a day?

  1. The data push can be customized to push only data that has changed, improving performance.
  2. When a form is saved, all calculations are executed first, and the Smart pushes are executed after all calculations are finished.  If Groovy is used and the data push is done inside a Business Rule, the order of operation can be a
    1. calculation
    2. data push
    3. calculation
    4. data push
    5. etc
  3. Since the Smart Push has a global limit of memory that can be used, and multiple people are running them through form saves, it is critical to make it as small as possible to reduce the probability of hitting that limit and increasing the odds of the Smart Pushes failing.

To date, I see the advantage of running a Smart Push (a Data Map on a form) in that most of the dimensions are already overridden and less overrides are required in the Groovy logic.  There is no difference in performance or the size of what can be pushed between the two when executed from a Groovy calculation.  The advantage of using a generic Data Map is that there is less effort in defining the form level Smart Pushes, and once one Groovy calculation is written to override all dimensions from a Data Map, it can be replicated easily to all required forms.

To understand the memory issues and explanation of how it differs from Data Maps and Smart Pushes, see PBCS Data Map / Smart Push Has Data volume Limits.

Data Map

Executing a Data Map is very simple and can be done in one line of code.

operation.application.getDataMap("Data Map Name").execute(true)

Calling execute() on a DataMap would execute the named Data Map (with no customization) and clearing the target location before pushing data.  Changing the true to false, or removing it, would remove the clear and leave the data as is.

To override the the dimension settings and increase or decrease the scope of what is used, the member names need to be further defined.  Every dimension’s scope can be changed, or just the ones that require a change in scope can be altered.  The following changes the scope for the account, scenario, version, and Entity dimensions.

operation.application.getDataMap("Data Map Name").execute(["Account":"Net Income, Income, Expense", "Scenario":"Budget", "Version":"Working", "Entity":"East Region"], true)

Smart Push

The Smart Push works exactly the same, except the object referenced is a Smart Push, and is obtained through the grid object, not the application.  Again, the likelihood that the Smart Push is further scoped is high, so it is reasonable that the dimensional parameters would be fewer as many of them change based on the POV selected.

operation.grid.getSmartPush("Smart Push Name").execute(["Account":"Min Bonus, Min Salary"])

One additional option is to define a Smart Push from a Data Map in the Groovy script.

operation.application.getDataMap("Data Map Name").createSmartPush().execute(["Account":"Min Bonus, Min Salary"])

Error Trapping

When these are written, it is likely that the Smart Pushes and Data Maps exist.  One extra step to ensure the calculation doesn’t fail is to verify their existence.  For Smart Pushes, verify that it is attached to the form.

//Data Map Example
if(operation.application.hasDataMap("Data Map Name"))
  operation.application.getDataMap("Data Map Name").execute(true)
//Smart Push Example
if(operation.grid.hasSmartPush("Smart Push Name"))
  operation.grid.getSmartPush("Smart Push Name").execute()

Conclusion

Creating variables to use in these functions to change the scope to only the rows and columns that have been edited, the calculation would look like this.  This is where I see the biggest bang for  your buck.  To understand more about using the grid iterator, read Adventures in Groovy Part 3: Acting On Edited Cells.  When a grid has hundreds of rows, only pushing the data that has been edited can make a huge difference in performance.

// Setup the variables to store the list of edited vendors and periods
def lstVendors = []
def lstPeriods = []
// Iterate through only the cells that were changed and create a list of changed vendors and periods
operation.grid.dataCellIterator({DataCell cell -> cell.edited}).each{ 
 lstVendors.add(it.getMemberName("Vendor"))
 lstPeriods.add(it.getMemberName("Period"))
}
// Convert the lists to a comma delimited string with quotes surrounding the members
String strVendors = """\"${lstVendors.unique().join('","')}\""""
String strPeriods = """\"${lstPeriods.unique().join('","')}\""""
// Execute the Smart Push with a change in scope to Vendor and Period
if(operation.grid.hasSmartPush("GP_SmartPush") && lstVendors)
 operation.grid.getSmartPush("GP_SmartPush").execute(["Vendor":strVendors,"Period":strPeriods]

With any luck, you will see significant improvement, unless they change every month of every row!


PBCS Data Map / Smart Push Has Data volume Limits

Introduction

When moving data in PBCS with Data Maps or Smart Pushes, they have limits on how much data can be moved.  The amount of data can be seen in the logs, and look something like this.

Failure

Exporting data…
Exported data file(s) size is: 207.1 MB.
Push Data failed. Error: Exported data size of data map that is being executed from groovy is more than permissible amount: 100 MB.

Success

Exported data file(s) size is: 464.7 MB.
EXPORT elapsed time: 39584
IMPORTING – AppName: AreakFin
TRANSFORM elapsed time: 63634
IMPORTING elapsed time: 21166
TOTAL elapsed time: 124553

Prior to the Feb, 2018 release, the following did not always hold true.  If you are/were seeing inconsistencies, see Bug Report: Push Data failed.  It also includes information about how the data cap works, as it is different between Data Maps and Smart Pushes, which is worth reading.

Data Movement Limits Identified

I got the following information from Oracle, and it is useful if you are using the data movement functionality.  When these are developed, it is a good idea to evaluate the size and plan for growth.  If the production data movements are nearing the thresholds, it is recommended to be proactive and try to reduce the POV that is used to move the data.  If it can’t be reduced, one option is to split it into multiple pushes which can be done with Smart Pushes on the Data Form save, or with Groovy.  Groovy also allows you to further condense the POV by dynamically changing the POV based on the cells edited, which is the most productive and efficient way to handle these.

So, here is what was documented.  The data limits imposed on the movement methods are below.

  • There is not a cap when running a Data Map
  • When executing the following, there is a cap of 100MB
    • Smart Push on a Data Form
    • Smart Push via a Groovy Calculation
    • Data Map via a Groovy Calculation

Summary

If you are not seeing this, I would recommend opening a ticket with Oracle to resolve.  I will be writing a post explaining how to execute and override POVs in Smart Pushes and Data Maps with a Groovy Calculation in the near future, so look for an article in my Adventures in Groovy series.


Managing Smart View Shared Connections

If you use Smart View, you are familiar with the Smart View Shared Connection URL, which is unique to the environment that Smart View connects.  That property is saved in a file on your computer and has the default URL, as well as all the saves URLs in the drop-down list.

There are times users want this drop down cleaned up.  If the URL changes due to environment changes, or they enter the wrong URL and it is saved, the need to clean up what is in this setting can reduce confusion and user frustration.  Often, IT departments want to deploy these settings and need to understand how to make every user’s Smart View configuration the same.  Understanding where these settings are stored and how the file that stores them is configured will assistance with either of these requests.

The user’s computer will hold, or require a file if a new deployment of settings is the path IT takes, in the following folder.

<drive>:\Users\<username>\AppData\Roaming\Oracle\SmartView

The drive is almost always C, and the username is unique to every organization in the naming convention used.  If the user already has setup Smart View, a file named properties.xml exists.  This file can be edited in any text editor.  If you are familiar with XML files, you will see a typical XML structure.

The entire file is enclosed in a cfg tag, so it is opened with <cfg> and closed with </cfg>.  The current provider URL is within a provider tag.  All saves provider URLs are inside a previousURLList tag and separated by a pipe (|) delimiter.  So, the file is laid out like this.

<?xml version=”1.0″?>
<cfg>
<provider></provider>
<previousURLList>provider 1|provider 2|provider 3|…</previousURLList>
</cfg>

As a consultant, I have many providers saved, so the configuration.xml file on my system looks like a little busy.  The file will likely be smashed together and not easily readable.  Opened in a text editor:

<?xml version=”1.0″?><cfg><provider><overrideWorkspaceUrl>https://planning-test-a499161.pbcs.us6.oraclecloud.com/workspace/SmartViewProviders</overrideWorkspaceUrl><previousURLList>http://mp1epm01:19000/SmartViewProviders|http://mp1epm01:19000/workspace/|https://planning-a499161.pbcs.us6.oraclecloud.com/workspace/SmartViewProviders|https://planning-test-a499161.pbcs.us6.oraclecloud.com/workspace/SmartViewProviders|https://planning-test-a499161.pbcs.us2.oraclecloud.com/workspace/SmartViewProviders|https://planning-test-shiloh.pbcs.us2.oraclecloud.com/workspace/SmartViewProvidersx|http://mp1epm01.huronconsultinggroup.com:19000/workspace/SmartViewProviders|https://mp1epm01:19000/SmartViewProviders|https://mp1epm01.huronconsultinggroup.com:19000/aps/SmartView|https://mp1epm01.huronconsultinggroup.com:13080/SmartViewProviders</previousURLList><overrideUrl/></provider></cfg>

If this file is opened in an XML editor, or viewed in Internet Explorer, it will be more readable.

If old providers need to be removed, they can be deleted from this file and the user will see the change the next time Excel is started. If there is a need to distribute a pre-configured setup, build this file manually, or use an existing user’s file, and deploy it to all new users.


Using a Shared Connection with HSGetValue/HSSetValue with Planning or PBCS

If you are a fan of the HSGetValue and HSSetValue, you probably are using a private connection. As you know, anybody that uses the template has to either change the connection string to their own predefined private connection, or set up a private connection with the same name. When dealing with inexperience users, both methods can be problematic.

You may be surprised to know that the Get and Set Value functions can use a shared connection.Rather than using the private connection name, the following can be specified to use a shared connection in place of the private connection name.

Private connection syntax:
HsGetValue(“PrivateConnectionName”,”POV”)
HsSetValue (dollar amount,”PrivateConnectionName”,”POV”)

Shared connection syntax:

HsGetValue(“WSFN|ProviderType|Server|Application|Database”,”POV”)
HsSetValue (dollar amount,”WSFN|ProviderType|Server|Application|Database”,”POV”)

Parameter Summary

  • “WSFN” is a static string and never changes
  • The provider type for planning is “HP” regardless of whether the server is a cloud server or on premise server
  • The server specifies the location of the server housing the application. For PBCS, use the URL provided by Oracle (planning-test-domain.pbcs.us2.oraclecloud.com)
  • The application is the application name
  • The database is the plan type, or database name

Put that all together and the string looks like this.
WSFN|HP|planning-test-A12345.pbcs.us2.oraclecloud.com|Finance|Revenue

Conclusion

Although there are a few drawbacks to using a shared connection (users could use the wrong connection and not get the expected result), my experience has been that the pros (no setup of private connections, can be used in multiple environments without changing anything, etc.) far outweigh the cons.


Creating a SmartList: Linking Smartlists to Web Forms

What is a Smart List?
  • Allows for creation of custom lists that can be used in data forms
  • Goes beyond the limitations of Essbase: these lists are not limited to numbers only
  • Users select a member from a designated list (each Smart List cell has a dropdown arrow that expands to allow member selection in web forms)

Examples…

  • Active Period: Manage Forecast/Budget months by setting them to either “Active” or “Inactive”
  • Employee Status: Set employee status to “Full Time” or “Part Time”
  • Justification: Choose from “Research”, “Customer Feedback”, or “Expansion”

Creating a Smart List

First, create a new dimension (File-> New-> Dimension) with SmartList as the dimension type:

Next, create children of ActivePeriod. These will be the members of the Smart List (Right click on ActivePeriod, Create Member-> As Child):

Set the properties for each of the Smart List’s members. The label will be what appears in the dropdown menu, while the value is the number that will be assigned to that member in Essbase. The list will be sorted from smallest to largest. Here are the properties for Inactive:

And the properties for Active:

The way this Smart List is currently set up, Inactive will appear above Active because 0 precedes 1.

Set the properties for the Smart List:

Here is a description of each of the Smart List Dimension Properties referenced from Oracle’s knowledge base:

Property

Description

Label

Enter the text to display when the Smart List is selected. Smart Lists and Smart List members must have a Label assigned. Spaces and special characters are allowed.

Auto Generate ID

Generate a numeric ID for each Smart List entry. If you do not select this option, you can customize Smart List ID values.

Start Value

Populates the Value property of the first member in the Smart List. For example, if the Smart List dimension is ActivePeriod with Start Value set to 0, the first member added to this list has a value of 0.

Increment

This value is appended to the value of the last member in the list to determine the value for the selected member. For example:

ActivePeriod (Start Value=0, Increment=1)

Inactive (Value=0)

Active (Value=1)

Display Order

Smart Lists can be sorted in the dropdown menu by 1 of 3 ways:

ID: Unique number that sets the order for the Smart List entry

Name: Unique name containing only letters/numbers & underscores. (i.e. “Active”). No special characters or spaces.

Label: Displayed text for the Smart List entry in the dropdown

#Missing Data Form Label

How #Missing values are displayed in Smart List cells:

Dropdown: Displays the label set in #Missing Drop Down Label

Grid: This selection determines what the cell will display on a form when the cell is not highlighted/selected

#Missing Drop Down Label

Enter a label to be displayed as an entry in the Smart List whose value is #Missing


Linking a Smart List to a Web Form

Create and/or use an already existing member in a dimension that is being used in the application to be associated with the Smart List. In this example the account associated with the Smart List is called “Active Period”. Notice that this member has a space in the middle, unlike our Smart List dimension “ActivePeriod”, which is all one word:

Set the properties for “Active Period” so that the Smart List property is tagged to ActivePeriod and the Data Type is SmartList:

The most critical step before deploying the application is to set the Data Type Evaluation Order for the Planning application. In order for Smart Lists to appear on web forms, the dimension that the Smart List is associated with (in this case the Account dimension) must be included in the evaluation order. From the local library, right-click on the application:

Move the account dimension over to the selected dimensions pane for the selected plan type:

Deploy the application for the changes to take effect so that the Smart List can be utilized in a web form.

Next, select the form that will be using the Smar tList. Edit it and go to the Layout tab. For this example, “Active Period” is placed as the lone member of the account dimension in the rows:

Save the form and open it to check that the Smart List is working properly. The list is functioning correctly if a dropdown arrow appears in the highlighted cell:

Click the dropdown to make a selection:

The Smart List has been successfully created and linked to a Planning web form. This feature offers great functionality for users that require text data, as this is not available through Essbase alone. Smart Lists can also be utilized in member formulas and business rules.

For more detailed technical information on Smart Lists, here is a link to the Oracle documentation:

http://docs.oracle.com/cd/E1282501/epm.111/epmarchitect/frameset.htm?ch04s16.html


Update for ASO (1/12/2015):


Recently, I was attempting to create Smart List functionality in an ASO cube. My only previous experience had been with BSO cubes, so I was not prepared for the couple of key differences that came up that hindered my progress. Here are the steps I took to successfully create a Smart List associated with an ASO cube. First, create a Smart List dimension by right clicking on the application in the dimension library:

For this example, I’ve named the Smart List “ClientSource”:

The Smart List has one member in it, “PV”:

And the Smart List will be associated with the account member, “ClientSource”:

In the account dimension, select the member that will have the Smart List associated with it (“ClientSource”),  and update the following 2 highlighted settings. This is the first part of the process that differs from that outlined above. In BSO, the settings are labeled “Data Type” & “Smart List”, rather than “Type” & “Smart List”:

After saving, I figured that the Smart List was good to go, but on deployment, I received the following error:

After some trial & error, the issue turned out to be coming from the data storage settings on the parents of “ClientSource”. After setting both parents (“AttributeInfo” & “Accounts”) to “LabelOnly”, the application deployed successfully.

To recap, there are 2 key differences between ASO & BSO cubes when setting up Smart Lists:

  1. For BSO, the user must set “Data Type” to “SmartList” for the associated member. While in ASO, the user must set “Type” to “SmartList”
  2. Before deploying the ASO application, the parent members of the member that is associated with the Smart List must be set to “LabelOnly”

I hope that this can help a few of you from having to spend time troubleshooting the difference between Smart Lists in ASO & BSO.


What’s New with Smart View

The newest release of Smart View (Release 11.1.2.1.102) includes many helpful, long-awaited features sure to both enhance the end-user experience and increase productivity. Many of the new features are examined below while a complete list and their descriptions can be found here.

Ad Hoc Operations in Multiple Cells

Previous versions of Smart View limited users to cell level ad-hoc operations. For example; say you wanted to ‘Zoom In’ on a member, Smart View limited this action to a single cell (single member). The newest version allows users to select a range of cells before performing an action allowing for quicker answers. Multi-cell actions such as Zoom In, Zoom Out, Keep Only and Remove Only are now permitted.  

Member Information

End users of Smart View often struggled to find additional information pertaining to members of a dimension from which they queried. This problem has been remedied with the new ‘Member Information’ button located in the Essbase ribbon. When focused on a single Essbase member, users can click the Member Information button and be presented with multiple member properties such as:

  • Dimension Name
  • Member Level
  • Member Generation
  • Parent/Child Name
  • Consolidation Operator
  • Alias Tables
  • Alias Names
  • Attributes
  • Formulas
  • Comments
  • User Defined Attributes (UDAs)

Linked Objects

End users with proper access can now add/ access ‘Linked Reporting Objects’ and ‘Linked Partitions’. Having Linked Reporting Object access allows for cells notes, external files and URLs to be linked to Smart View data cells for reference. Access to Linked Partitions enables connection between 2 separate databases. This allows users to navigate database ”A” while connected to database “B”, opening up additional data analysis opportunities.

Displaying Member Names and Aliases

Previous versions of Smart View generated a common complaint centered on the display of member names versus aliases. Essbase and Planning users familiar with the Essbase Add-In were accustomed to displaying both member names and aliases in a retrieve. These users had become frustrated by Smart View’s inability to function similarly. This problem has been fixed with Oracle’s latest release whereas users now have the option to display member names and their aliases, side-by-side, on retrieves.

POV Toggle

The ‘POV Toggle’ button allows end-users the ability to move dimensions from the Smart View POV Toolbar to row one, thus placing all dimensions on the grid. Users familiar with the Essbase Add-In will appreciate this functionality, allowing ‘power users’ quicker retrieve setup times. This can easily be switched back with the click of the POV Toggle button.

Sheet Level Options

Previously, all Smart View specified Options were global in nature. Options found in the ‘Options’ dialog box including ‘Member Options’, ‘Data Options’ and ‘Formatting Options’ are now sheet specific, allowing for multiple sheets to function with their own definitions. This means ‘Sheet 1’ could drill to the bottom level and display only member names while ‘Sheet 2’ could drill to the next level and display the combination of member name and alias. Note that options found in ‘Advanced Options’, ‘Cell Styles’ and ‘Extensions’ remain global in nature.

Butterfly Reporting

One of the commonly used features of Financial Reporting involves the use of ‘Butterfly’ reporting. Butterfly reports display a column of dimensional members between two columns of data.

New Zoom Options

Users now have additional ‘Zoom’ options including:

  • Same Level
  • Sibling Level
  • Same Generation
  • Formulas (retrieve data for all members that are defined by the formula of the selected member)

Submit Data without Refreshing

Gone is the requirement to refresh a grid prior to submitting data while in Free-Form mode.


As noted above, this review includes many, but not all new features released with Smart View 11.1.2.1.102. Please visit Oracle for a complete list and description of each new feature.