Adventures in Groovy – Part 18: Real Time Data Movement (Setting The Stage)

Introduction

One of the challenges with Hyperion Planning is the ability to move data between applications in real time.  A classic example of this is a P&L application with other modules that have greater detail.  The following is an example.

  • A Gross Profit specific database that includes a product, delivery channel, and product type dimension.
  • A CapEx specific database with asset type, asset, and asset category
  • A Workforce specific database with job type, union, and employee.
  • A P&L application that includes income and expense with information fed from the detailed models at consolidated levels.

In June of 17, with the release of Groovy Calculations, the ability to update any of the detailed models and synchronize the consolidated data in real time to the P&L database became possible.  When a user saves data, within seconds, the data can be reflected in a database with different dimensional.

Setting The Stage

This is going to be a lengthy, multi part article.  Before we begin, the application architecture is going to be laid out so the calculations can be explained in detail.  The application will consist of 2 play types.  The first is the P&L and the second is a detailed product planning play type.  We won’t introduce a Capex and Workforce model.  It will only complicate the explanation and is redundant in the logic required.

The data flow and architecture looks like this.GP (Gross Profit Product Detail) databases

The initial plan type is called GP

Although this may not match with your model, the concept is the same.

  • It has dimensions that are required to plan at a product level that don’t exist in the P&L application.
  • It has specific logic that doesn’t apply to other databases.
  • It has a unique account dimension that doesn’t mirror what is in the other applications.
  • Consolidation takes a long time and is not optimal to be performed on a data form save.

As previously stated, the same differences will exist in other models, like Capex and Workforce.

Fin (Income Statement / Balance Sheet) databases

The Fin application is a typical consolidated reporting application that excludes details like product level revenue, employee level plans, and assets and their properties needed to calculate capital expense.

Dimensional Summary

For this example, the following shows the application dimensions and database associations

The Synchronization Process

The GP database includes 3 dimensions that don’t exist in the Fin model.  For this to be moved to the Fin model, 3 dimensions need to be consolidated.  The GP model also has a different account structure.  A translation between the two account structures has to occur before the synchronization can be completed.  The other piece that is not required, but highly encouraged, is to only work with the data that has changed.  So, this will dynamically select the data rows on the form that have been edited by the user.  Functionally, the following happens when a user saves a data form.

  • Identify the members that need to be included in the synchronization
  • Push the level zero data from the GP BSO database to the GP ASO database (only edited data)
  • Retrieve the data from the GP ASO database at a total product, channel, and material group
  • Submit the data from the above retrieve to the Fin BSO application and the rFin ASO application
  • Execute any logic that needs to be completed in the Fin application (taxes, driver-based data, etc.)
  • Push the level zero data from the Fin BSO database to the Fin ASO database

Groovy Methods Required

There is a lot going on here, so we are going to summarize and explain the Groovy methods that will be used to accomplish the synchronization.

DataGridIterator

To make this as efficient as possible, it is important to only execute the methods on the data that have been edited.  If you haven’t read Part 3 of this series, take a look before you continue.

DataMap / SmartPush

Once the POV is identified that needs to be included in the synchronization, the first operation is to push that data to the reporting cube.  This will be used a couple of times in this sequence.  Part 8 of the Groovy Series covers this in detail and an understanding is helpful before you continue.

DataGridBuilder / DataGridDefinitionBuilder

This has not been covered yet.  These methods give you complete control to simulate a retrieve and submit.  These two objects are the major pieces of the puzzle that have never really been exposed in any fashion.  These are the methods that really open up the possibilities for real time reporting.

Take A Breath

You may be a little overloaded with new information.  We will let this settle in and give you a chance to digest the concepts.  The next article will walk you through the code.  To satisfy your curiosity, watch this video, which takes you through the above example in a live environment.


Adventures in Groovy – Part 13: Returning Errors (Data Forms)

Introduction

One of the huge benefits that available in Groovy Calculations is the ability to interact with a user, validate data, and act on the validation.  Now, we can interrupt form saves, stop Run Time Prompts from continuing, and communicate information back to the user.There are a number of functions for validation, and they can be categorized functionally. Although they all can be use somewhat interchangeably, the logical uses are

  • Data Form validation functions
    • addValidationError
  • RTP validation functions
    • validateRtp
  • Validation functions that are more open ended and can be used just about anywhere
    • messageBundle
    • messageBundleLoader
    • throwVetoException

In this post, we will discuss one aspect of this, and probably the simplest application, validating Run Time Prompts (RTP).

The MessageBundle

Before a few of the methods can be used, one must first understand the MessageBundle and MessageBundleLoader methods.  To look at documentation, they might seem very complex, and a maybe a little intimidating.  The reality is that these are just objects that hold the error messages.  That is pretty much the long of short of it.  The messageBundle holds a map (basically a lookup table that is two columns and n rows) of the error ID and the description of the error you want to display.  If the application is consumed by users with multiple languages, a messageBundle can be created for each language.  The messageBundleLoader allows you to identify which bundle to use based on the user’s local.  The example below should answer any questions you have.

The Message Bundle

Think of this method as an array, or a table in Excel.  It has 2 columns (ID and message).  It can have an infinite amount of rows.  The syntax of this is “[id:message]”.  For multiple errors, the id:message is duplicated, separated by a comma, like “[id,message,id:message]”.  Here is an example of a messageBundle with one error.

def mbUs = messageBundle( ["validation.InvalidCharacters":"Only alphanumeric characters can be entered (a-z, 1-9)."] )

And with two errors.

def mbUs = messageBundle( ["validation.InvalidCharacters":"Only alphanumeric characters can be entered (a-z, 1-9).",
"validation.Negative":"A positive number is required."])

And with two errors in Spanish.

def mbSpanish = messageBundle( ["validation.InvalidCharacters":"Sólo se pueden introducir caracteres alfanuméricos (a-z, 1-9)."],
["validation.Negative":"Se requiere un número positivo."])

This can be extended to hold all the error messages required for the scope of the calculation in all the locales required.

The Message Bundle Loader

The messageBundleLoader is the piece that pulls either a single, or multiple, messageBundles together to use in a call.  If only one language is required, it would look like this.

def mbl = messageBundleLoader(["en":mbUs])

For multiple languages, or multiple messageBundles, they would be concatenated together with commas.  View a valid list of locales to make sure the parameter in parenthesis is correctly linked to the correct locale.

def mbl = messageBundleLoader(["en":mbUs", "es":mbSpanish])

Throw an Exception (Interrupt Form Save)

Here is where the cool stuff happens.  see post about looping through cells

If a validation error exists, an exception can be generated to stop the form from saving.  To do this, simply use the throwVetoException method.  This accepts 2 parameters.  The first is the messageBundlerLoader, and the second is the id associated to the to be displayed.  Using the example above, and assuming the local is US, the following would stop the form from saving and display a message of  “Only alphanumeric characters can be entered (a-z, 1-9).”

throwVetoException(mbl, "validation.InvalidCharacters")

Consolidated Example

The following example creates two error messages in two languages.  On form save, this will loop through all the cells and throw an error if any value is negative.

def mbUs = messageBundle( ["validation.InvalidCharacters":"Only alphanumeric characters can be entered (a-z, 1-9).",
"validation.Negative":"A positive number is required."])

def mbSpanish = messageBundle( ["validation.InvalidCharacters":"Sólo se pueden introducir caracteres alfanuméricos (a-z, 1-9).",
"validation.Negative":"Se requiere un número positivo."])

def mbl = messageBundleLoader(["en" : mbUs,"es" : mbSpanish])

operation.grid.dataCellIterator.each {  
  if(it.data < 0)  
    throwVetoException(mbl, "validation.Negative")
  }

Wrap Up

It has been a long time since developers have had this kind of control.  The possibilities are only limited by your imagination and business requirements, but there isn’t any validation that can’t be done.  Future posts will tackle validating Run Time Prompts, and taking form validation one step further by adding cell level tool-tips and color coding.

The last thing with these validation calculations is the importance of when they are executed.  The documentation I have from Oracle states something slightly different, so I don’t know if this is the way it is supposed to work, but in my experience, where the rule runs is critical.  Here is what I am experiencing.

  • When the rule is set to Run Before Save, and there is a validation error, the user can’t save the form and an error messages is displayed in the correct locale.  To me, this is the experience that is expected.
  • When the rule is set to Run After Save (which is the way it is documented), and there is a validation error, the user receives an error, but the data is saved.

The difference in the above does provide some interesting options.  Let’s say that we have a form and users are required to allocate an expense.  If the expense is not allocated at 100%, the form can’t be saved.  Assume that there is a rule that the expense shouldn’t be allocated to more than 3 places, but users should be warned if it is.  In this case, if the rule is set to run AFTER save, the user gets the message, but the data is saved.

Either way, if the rule is executed before other rules on the form, no subsequent form will fire if there is a validation error.


Adventures in Groovy – Part 2: Data Validation

Introduction

We all know the Data Form validation rules are serviceable, but they are not robust.  When Smart View advanced and forms were opened in Excel, the validation logic developers had in JavaScript became useless.  Since then, we have really missed the ability to communicate with the user interactively with visual cues and validation rules that halted the saving of data.  Well, Groovy calculations to the rescue!

I will preface with the fact that I am encountering some odd behavior, so I am going to break this up into multiple articles.  It appears that Oracle is validating Groovy enhancements in Data Forms on the web, and not necessarily testing the full functionality in Smart View.  Currently, I have this working in a browser perfectly, but 3 of the 8 columns are failing in Smart View.  I am hoping to get closure to a ticket on this in the near future.  When I get a resolution, I will amend this article with some clarity on either what I am doing wrong, or when it will be resolved.

High Level requirement

At a high level, the planners want to see any seeded value that was changed with a different background color to single out the lines that have been edited.

The Details

We have a form that provides the users the ability to override seeded data.  In this example, a planner can change the Average Price/Case, Net Sales, and/or GP Level 2 at any level of the hierarchy and gets allocated down to level 0 on a % to Total.  This form has the accounts in question for 3 sources.  The override columns are a separate version that is set to top down so security doesn’t prevent them from entering at a non-level 0 member.  This is only used to enter the 3 values, is used to calculate the Input source, and is cleared.

The Initialized source is seeded from prior year growth.  This, in essence, is the basline seeded amount.  At initialization, the Input source is a duplicate of Initialized source.


The Initialized source is also on the form.  When overrides are entered, it is applied to the input source.  At this point in the process, the Input is different from the Initialized source, as shown by the orange color in the previous image.

Why Not Validation Rules?

First, there is limited functionality in the Data Form validation rules.  In this case, the functionality is there, but has an issue with the precision of the data.  Even though Input equals Initialized (or appears to),  validation fails and shows a different background color.  I have seen this before with decimals with large precision.

How Groovy Solves This

Groovy calculations have the ability to traverse through the cells of a Data Form.  The 8 cells that can be impacted by the 3 overrides can be checked against their counterpart in subsequent columns (comparing the same account in the Input source to the Initialized source).  This is for another discussion, but Groovy can actually create temp grids and pull data directly from Essbase that doesn’t exist in the grid, too.

To simplify this, the following only loops through the first column – Avg Price / Case.  This can be replicated easily for all subsequent columns by changing the account in question.

This example uses several Groovy methods/functions.  First, the data grid is stored in a variable, as it will be referenced throughout.  Next, we are using the dataCellIterator, which is the same in the previous post on Groovy.  If you didn’t read that, or don’t understand the iterator, check that out.

At this point, the calculation is requesting to loop through all the cells with Avg Price/Case AND Input in the POV.  Inside the loop, lDestMembers is set to a list equal to all the members in the POV for the relative cell.  memberNames returns every member in the POV in a Groovy list.

The next step is getting the value for the corresponding cell in the Initialized source.  getCellWithMembers accomplishes this with the appropriate parameters passed.  This function accepts member names, so all the members in the Input cell’s POV are used, excluding the source dimension.  This is changed to Initialize.

Lastly, the comparison is made between the two cells.  If they are not identical, setBgColor is executed on the Input source cell to identify it as something that has changed due to an override.

The Calculation

// Initialize a grid
DataGrid curDataGrid = operation.grid
// Set the color to be used if the values are not identical
def iColor = 16746496
// Loop through the cells in column that has
//  Average Price/Case and Input in the POV
operation.grid.dataCellIterator('Avg_Price/Case','Input').each
  {
    // Get the POV for the cell
    def lDestMembers = it.memberNames
    // get the value in the Initialized source that is equivalent to
    // the cell in the Input Source.  The POV form the Input source
    // is used with the exception of the source is changed to Initialize
    def dValue = operation.grid.getCellWithMembers(lDestMembers[0].toString(),
    lDestMembers[1].toString(),lDestMembers[2].toString(),
    lDestMembers.toString(),lDestMembers[4].toString(),
    lDestMembers[5].toString(),"Initialize",lDestMembers[7].toString(),
    lDestMembers[8].toString(),lDestMembers[9].toString(),
    lDestMembers[10].toString()).data
    // if the value is different between the Input and Initialized source,
    // change the background color
    if(it.data != dValue)
    {
      it.setBgColor(iColor)
    }
  }

Data Form Changes

This new Groovy Business Rule should be added to the form and executed on load and save.  This will ensure that the accounts that have been changed are identified both before, and after, the user makes any changes.  One more note that might save you hours of frustration – make sure this rule runs last when other rules are also executed!

Conclusion

This opens up a lot of options that far surpass the default form validations.  Other options are available.

  • Tool-tips can also be assigned to a cell instructing the user how to resolve a validation error, if one exists.
  • The form save can be interrupted, stopping the user from saving data on a form (or even saving only parts of the form) when validation errors exist.
  • Data can be altered to force validation prior to saving.
  • Detailed messages can be displayed with instructions and other communication to the user.
  • Have specific calculations executed based on the data entered.

This is not an exhaustive list.  We, as developers and architects, literally can do anything we want and have complete control over what happens and what doesn’t happen.  This is exciting because we have nearly complete control over what happens on save.  If you have other ideas, or questions, please share them with comments.


My Adventures in Groovy Calculations – Part 1

What Is Groovy

Recently, Groovy scripting was added to ePBCS business rules as an option instead of the GUI, or the go-to scripting for you old-timers who still refuse to change.  These are defined in the Business Rule editor as Groovy calculations.  So, what is Groovy?

“Apache Groovy is an object-oriented programming language for the Java platform. It is a dynamic language with features similar to those of Python, Ruby, Perl, and Smalltalk. It can be used as a scripting language for the Java Platform, is dynamically compiled to Java virtual machine (JVM) bytecode, and interoperates with other Java code and libraries. Groovy uses a Java-like curly-bracket syntax. Most Java code is also syntactically valid Groovy, although semantics may be different.”

If you haven’t heard of Groovy, you may want to do some research.  Oracle is using more and more Groovy in applications as administrative options and a communication method between applications.  Groovy is a standard and can be used with millions of applications and websites with the REST API.

What Groovy Script/Calculations Are Not

Groovy calculations are not java-based calculations.  It is not a new calculation language.  It does provide a way to interact with a Data Form in ePBCS and build a calculation script dynamically.  So, Groovy, in the context of Groovy Calculation Scripts, does not connect to Essbase via Groovy Business Rules. It simply builds a string that is sent to Essbase as a calculation.  It does, however, interact with Planning and that is where the power starts.  With the ability to have all the Groovy functionality to manipulate strings and now the ability to interact with the data form, dynamic calculations can be built.  The calculation script sent to Essbase is no different, but the script can now be dynamically generated based on things like, the POV, the text value of a Smart List, whether the values in the grid were updated, whether the data entered meets validation criteria, and other similar things.

If you are experienced with Hyperion Planning, you may have dabbled with JavaScript to do data validation, calculate data prior to the user submitting it, or prevent users from submitting data.  It was a great option to provide feedback to users, but that basically was useless when Smart View allowed users to open Data Forms in Excel. The JavaScript did nothing unless the form was opened in an internet browser.

Getting Started

The first step in creating a Groovy Calculation Script is to, well, create one.  To do that, create a new business ruleChange the view from Designer to Edit Script.  If you haven’t noticed this before, it provides a way to toggle the GUI to a script view.

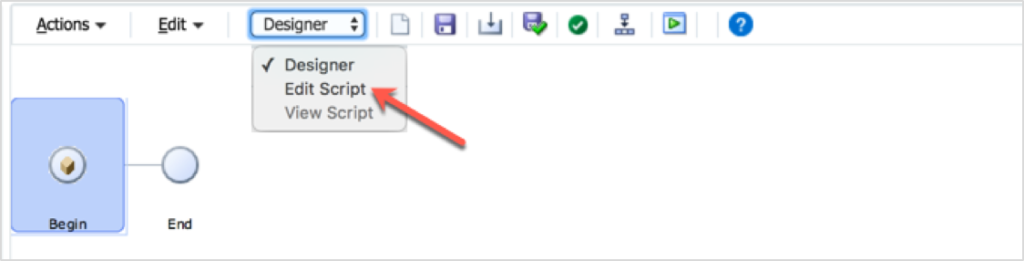
Next, find the drop-down box in the toolbar to the far right named Script Type.  This option will read Calc Script.  Change it to Groovy Script.

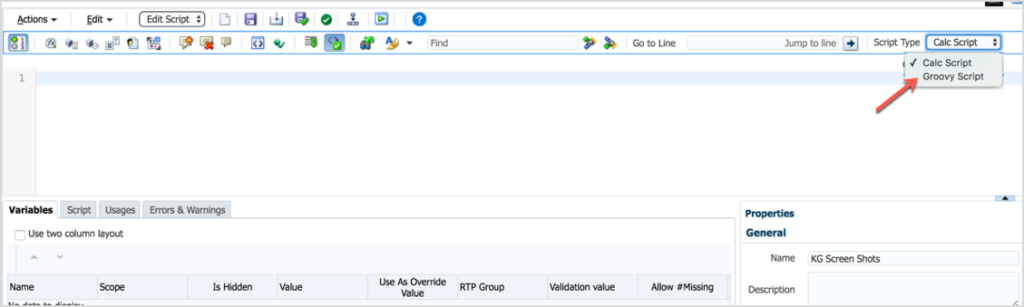
AAt this point, the script window is now set to validate Groovy script, not Essbase syntax. Even though it doesn’t do anything yet, you have just created your first Groovy Business Rule!

Use Cases

There is a lot of potential in this functionality.  To get you thinking, here are some examples:

  1. Execute calculations on large sparse dimensions on ONLY the members that changed on the form.
  2. Access the Smart List text to do validation, use in calculations, and store for later use in Essbase (maybe save a member name in a member that is numeric, like employee ID, Cost Center, or account).
  3. Perform validation before the calculation is built and sent to Essbase. For example, if the sum of a column used to allocate dollars doesn’t sum to 100, send a calculation that ONLY returns a message and doesn’t perform the allocation.
  4. Perform text manipulation previously done in Essbase with functions.  Concatenating member names and truncating member name prefixes and date formats are some of the few I use regularly.  Many of these functions are extremely slow and force the calculation to execute in serial mode, so to be able to do them outside the script is now an option.

Real World Example

The Problem

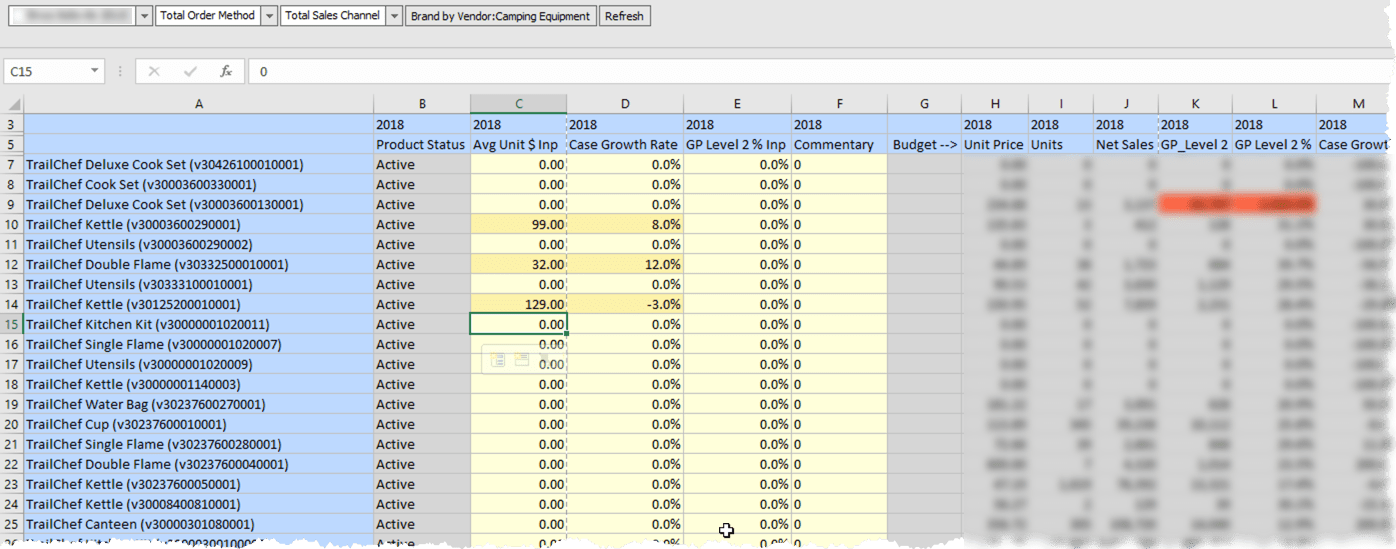
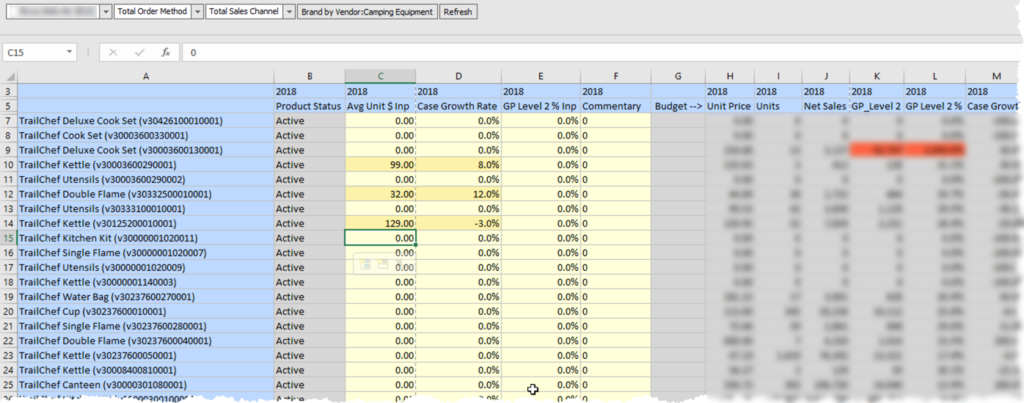
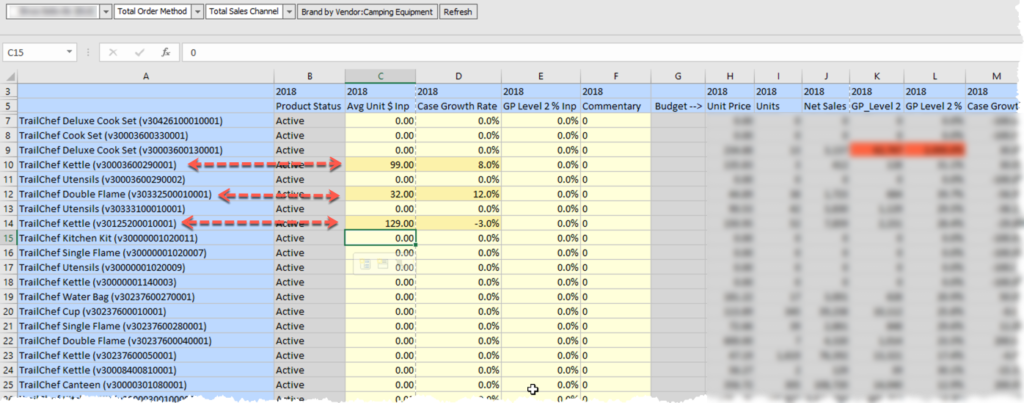
I am working with a client who wants to override the result of driver-based calculations based on historical trends.  In this example, the volume of cases can be changed and the profit rate can be adjusted.  Once the form is saved, the overrides need to be removed.

Here-in lies the challenge.  If the overrides are removed and the calculation runs on all members in the form, the results would revert back to what they were prior to the override because the override values no longer exist in the database or Data Form.  So, rather than perform the calculation on the override, it would use #missing  or zero, and take the results right back to what the drivers dictated.  The most obvious way around this issue is to execute the calculation on ONLY the rows (vendors in this example) that were edited. In other words, dynamically generate the FIX statement on the vendors that were updated.

The Non-Groovy FIX Statement

Without Groovy, the FIX statement would include @RELATIVE(“Vendor”,0) to run the calculation on all venders on the Data Form.  This has 2 issues.  One, it calculates all the vendors and will change the vendors back to the pre-override values.  Two, every time the user saves the form, the fix is traversing through 30,000 possible vendors.  Although most companies have less than 8,000 active vendors, it still poses a performance issue calculating 8,000 blocks when only a few typically change.

The only aspect of the calculation that is going to change in this situation is the FIX statement, so that will be the only piece shown in the comparison between a Groovy script and a non-Groovy script.

FIX(&vScenario,
    &vVersion,
    &vCompany,
    &vYear,
    "Local",
    "Input",
    @RELATIVE(“Vendor”,0),
    "Jan":"Dec",
    "Regular_Cases")

The Groovy FIX Statement

Since Groovy can dynamically create the calculation script, it looks more like the example below. The sPov will be a string variable in Groovy that holds all the members in the data form’s POV.  The sVendors Groovy variable will hold the list of vendors that have been edited.

FIX($sPOV
    $sVendors,
    "Jan":"Dec",
    "Regular_Cases")

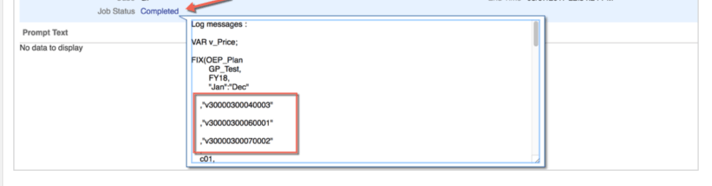
@RELATIVE(“Vendor”,0), which would produce a list of every vendor in the hierarchy, is replaced with “V300000300040003”, “V300000300060001”, “V300000300070002”.

The issue of running the calculation on vendors that have not been edited has now been solved.  An added benefit is that the calculation runs on 3 of the 8,000 blocks, so what took 30 seconds now completes in under a second.

Now, The Interesting Part

Let’s dissect the Groovy calculation script piece by piece.

Setting The Stage

For Groovy to perform operations, there are a few housekeeping items that need to be addressed.  First, a few string builders need to be created to store some variables of strings that grow through the process and are concatenated to Essbase calculation before it is submitted for processing.

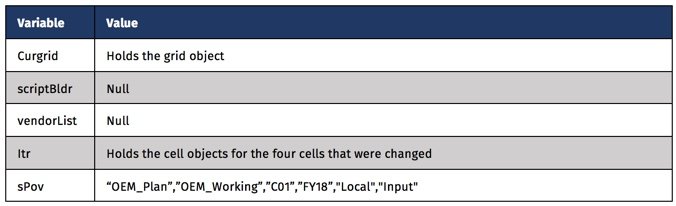
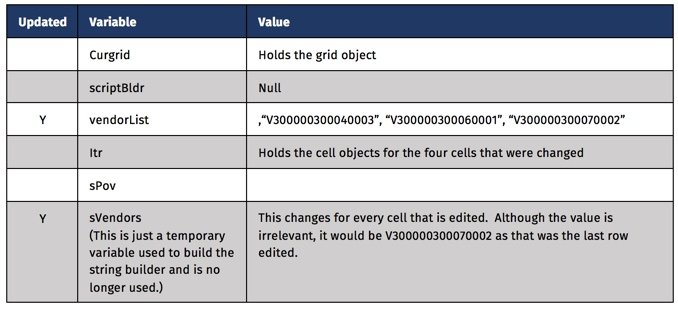
There are some variables used to interact with the form’s data grid.  For easy reference to the grid through the script, the grid object is stored in a variable (curgrid).  Next, a variable is created to hold the result of the cells that have been edited (itr).    The likelihood that these variables would exist in most of the scripts is high, so it might make sense to get familiar with these objects and their parameters.

//Get current Data Form
DataGrid curgrid = operation.getGrid()

// Construct a string builder
// Holds the calculation script sent to Essbase
StringBuilder scriptBldr = StringBuilder.newInstance()

// Holds the value for the venders that have changed
StringBuilder vendorList = StringBuilder.newInstance()
String sVendors

// Iterater which gives you only the edited cells
GridIterator itr = curgrid.getDataCellIterator(PredicateUtils.invokerPredicate("isEdited"))

// Holds the list of members from the POV – the function returns an array, so this
// parsed the array and places quotes around each member and separates them with a comma
String sPov = '"' + curgrid.getPov().essbaseMbrName.join(',').replaceAll(',','","') + '"'

At this point the values of the variables are as follows.

Find the Vendors That Have Changed

We know the users will enter overrides in this Data Form (Case Growth and Average Price).  The following piece of the Groovy script will build a delimited list of those vendors based on the rows that have been edited.  It will include quotes around the member names to account for any member names that are numeric or have special characters and will be separated by a comma.  Groovy provides the ability to append to a string with <<”””, and close it with “””.  The if statement ensures that a vendor will not be appended to the string if multiple columns are changed.

// Loop through each cell that was edited and build the vendor list
// If multiple cells on the same row are edited, only add vendor once
itr.each{ DataCell cell ->
  sVendors = cell.getMemberName("Vendor")
  if(vendorList.indexOf(sVendors) < 0){
    vendorList <<"""
   ,"$sVendors"
   """
  }
}

At this point, only a few variables have changed. The bulk of the Groovy functionality is finished.  We now have the POV and the list of vendors that need to be in the FIX statement.

The Essbase Calculation

The next section will append text to the scriptBldr string.  This string will ultimately be sent to Essbase as the calculation to be performed.  Groovy variables are embedded and replaced with the value that they were set to previously.  The two used in this calculation are $vendorList and $sPOV.  Other than those two pieces, everything else is pulled from the original Business Rule and highlighted in red below.

// Add the calculation defined in a business rule to the string variable
// the POV and Vendor List will be used to dynamically set the FIX statement
scriptBldr <<"""
VAR v_Price;

FIX($sPOV
    $vendorList,
    "Jan":"Dec",
    "Regular_Cases")

  /* Calculate Overrides */
  "OEP_Working"(
  v_Price = "Avg_Price/Case"->"YearTotal";

  "Regular_Cases" = (1 + "Case_Growth_Rate"->"BegBalance") * 
                    ("Regular_Cases"->"FY16"->"Final");
  IF("Avg_Price/Case_Inp"->"BegBalance" == #Missing)
    "Net_Sales" = (v_Price) * (1 + "Case_Growth_Rate"->"BegBalance") * 
                  "Regular_Cases"->"FY16"->"Final";
  ELSE
    "Net_Sales" = ("Avg_Price/Case_Inp"->"BegBalance") * 
                  (1 + "Case_Growth_Rate"->"BegBalance") *
                  "Regular_Cases"->"FY16"->"Final" ;
  ENDIF

  IF("GP_2_%_Inp"->"BegBalance" == #Missing)
    "GP_Level_2" = ("GP_Level_2_%"->"YearTotal"->"FY16"->"Final") * "Net_Sales" ;
  ELSE
    "GP_Level_2" = ("GP_2_%_Inp"->"BegBalance") * "Net_Sales" ;
  ENDIF
  )
ENDFIX

FIX($sPOV
    $vendorList)

  CLEARDATA "Avg_Price/Case_Inp"->"BegBalance";
  CLEARDATA "GP_2_%_Inp"->"BegBalance";
  CLEARDATA "Case_Growth_Rate"->"BegBalance";
ENDFIX
"""

At this point, the scriptBldr variable is a complete Essbase calculation that can be validated in any Business Rule.

Finishing UP

The last thing required is to send the calculation text built above to Essbase.

println scriptBldr // Sends the script to the log
return scriptBldr // Sends the script to Essbase

Verifying What Was Sent To Essbase

When the Data Form is saved, the results in the form can be validated back to the logic to verify that the calculation worked as expected.  Regardless of whether the calculation executes with or without failing, the value of scriptBldr ( calculation sent to Essbase) is captured in the Job console.

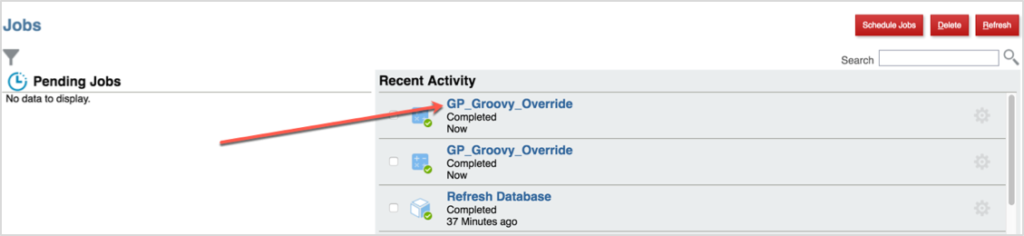
In the Job console, click the Job Status link.  This includes the value of the scriptBldr variable.  The text can be copied from this window, and if it failed to execute, can be copied into a Business Rule and validated there to find the issue.

Wrapping Up

I will admit that I am not a Java programmer, so I am still educating myself on the potential this affords developers.  I am struggling to digest the API documentation and to truly understand the depth of the possibilities. I do know this opens up a whole world we didn’t have with Hyperion Planning. I plan on learning and using Groovy calculations more and more because of the possibilities it provides.  Look for more examples and knowledge sharing as I get my hands around the API and integrate this into more delivery solutions.  To get future publications, sign up to be notified about new posts and articles at www.in2hyperion.com.
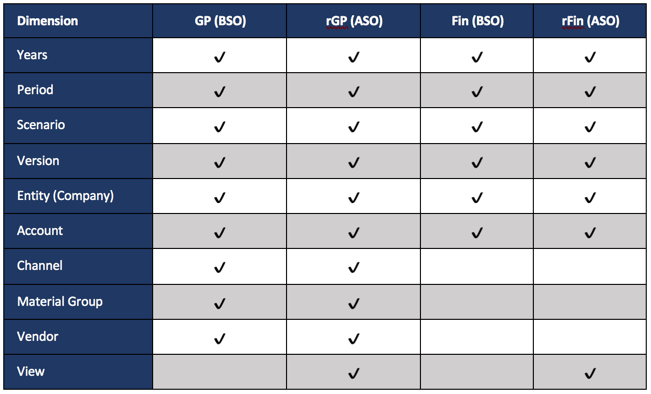


One at a time, please

Introduction

One of the problems with giving users of Hyperion Planning the ability to run calculations is opening up the possibility for all of them to run the same calculation at the same time.  This can cause a range of issues, from slower performance, to calculations never finishing due to locked blocks, to crashing the server.

Prior to Planning, I created VB applications to monitor what was calculated to make sure multiple calculations were not executed at the same time.  Initiating a calculation through a web portal allowed us to notify the user that the calculation request was ignored because a calculation was already running.

Both Essbase and Planning have come a long way since the 90s.  With the introduction of the @RETURN function, developers can interact with users and create a break in a calculation (business rule) so it doesn’t proceed.  The message is still reactive, but with some creativity, there are some really awesome things you can achieve.  Controlling what calculations are executed simultaneously is one of those things.

The Goal

Assume an application has a global consolidation calculation that is required to be executed for reporting requirements.  Since the administrators don’t want to be bothered at all hours of day and night, they want to enable the users to run the calculation and ensure it isn’t run more than one time during the calculation window.

This assumes the 6 required dimensions in Planning, plus a Department dimension.

The Method


Make a predefined placeholder where an indicator can be saved – a 1 or a 2.  When the calculation is executed, the value will be set to a 1.  When the calculation is finished, the value will be set to 2.  When the calculation is initiated, it will check that value.  If it is a 2, the calculation will execute.  If it is a 1, it assumes a calculations is already running so it will abort and notify the users.  This ensures that the calculation will never run twice at the same time.

Note:  I prefer the use of 1 and 2 over 0 and 1.  Many times a process is implemented to eliminate zeros and restructure the application periodically.  Not using a zero can eliminate errors in some situations.

Example

FIX("No Entity","No_Dept","No Account","Budget","FY15","BegBalance")    SET CREATEBLOCKONEQ ON;    "Working"(      /* Check to see if a calculation is running         If the flat is a 1, return a message and stop the calculation         If the flag is a 2, continue */      IF("Working" == 1)        @RETURN ("This calculation is already running.  Please come back at a
                       later time and try again.", ERROR);      ELSE        "Working" = 1;      ENDIF)    SET CREATEBLOCKONEQ OFF;  ENDFIX     /* Aggregate the database */  FIX("Working","Budget","FY15")    AGG("Entity","Department");  ENDFIX     /* Set the flag back to 2 */  FIX("No Entity","No_Dept","No Account","Budget","FY15","BegBalance")    "Working" = 2;   ENDFIX

Summary

This method could be used in a variety of situations, not just a global calculation.  If this inspires you to use the @RETURN in other ways, please share them with the In2Hyperion and we can make your solution available to everybody.


Password Encryption – Business Rule Batch Files

I recently learned the importance of encrypted passwords in batch files. Without a password file, the scripts will still run, but the user is prompted to input a password in the command prompt after initialization. Encrypted passwords allow for the automation of these scripts. Shout out to Sumit Deo for his patience in guiding me through the initial process and helping me with my batch scripting skills along the way.

From Oracle’s documentation, a password file in business rule batch files is optional.

However, when executing the batch, the user will be prompted to input the password:

In order to automate this batch file, the password file becomes a necessity. We could put the password in a .txt file and reference that, but for security purposes it makes more sense to encrypt the password. To create an encrypted password, use the “PasswordEncryption.cmd” Windows command file which is located at D:\Oracle\Middleware\user_projects\foundation1\Planning\planning1

In this folder, create a new folder called Password and save a blank notepad file titled Password.txt. Next, open up a command prompt and enter the following command (the first half calls the password encryption file & the 2nd half is the path and file name where the encrypted password will be saved:

D:\Oracle\Middleware\user_projects\foundation1\Planning\planning1\PasswordEncryption.cmd D:\Oracle\Middleware\user_projects\foundation1\Planning\planning1\Password\password.txt

Upon hitting enter, the screen will prompt for a password to be encrypted. Type in the password (nothing will appear on the screen) and hit enter again.

The screen will display as follows, noting that the password has been encrypted to the desired location & file:

Check the password file for the encrypted password:

The next step is to include the encrypted password into the business rule batch file, so that the rule will run automatically when called from the script. The syntax for the command is as follows:

CalcMgrCmdLineLauncher.cmd [-f:passwordFile] /A:appname /U:username /D:database [/R:business rule name | /S:business ruleset name] /F:runtime prompts file [/validate]

We will be focusing on the -f:passwordFile portion of the command. To specify where the encrypted password is stored, -f:passwordFile becomes:

The %CALCLAUNCHER% variable is equal to D:\Oracle\Middleware\user_projects\foundation1\Planning\planning1

Now that the encrypted password has been inserted into the command line of the business rule batch file, the batch will run to completion without stopping to ask the user to input a password. This comes in very handy when attempting to automate multiple tasks in one batch script.


Calc Manager: Fixing Corrupt Rules & Rulesets

I was recently testing out the performance of rulesets that were attached to forms, and ran into an issue that had me scratching my head. Certain rulesets were not running or even appearing on forms that they were attached to in the Planning application. Turns out, the rules had been corrupted in the transfer between Calc Manager and the Planning application

The issue first appeared when looking at a Planning form. Prior to the testing, I had attached a ruleset to the Brokerage and Commission form. However, when looking at the form, the ruleset was nowhere to be found:

However, with a little digging, I was able to verify that there is indeed a ruleset attached to the form:

So, where is the breakdown happening?

From the Planning application, let’s take a look at the Business Rules to see if we can gather any more information:

Notice that some of the rulesets say “None” instead of displaying the play button. Broke_Comm, our missing ruleset, is displaying “None”:

It looks like we found the issue. These rules have been corrupted and will not launch in the Planning application. That would explain why we were not seeing the rulesets on the forms. Some maintenance is required to get the rules back up and running. Here are the steps I took to fix the issue:

Open up Calc Manager and select deployment view:

Expand the “To Be Deployed” folder and uncheck all of the rules (this list of rules should match up with the corrupted rules – rules displaying “None” in the Launch column – from the Planning app):

Right click on the application in deployment view and select Deploy:

In Planning, verify that there are no longer any non-launchable rules:

Next, head back to Calc Manager and check all of the rules that are under the “To Be Deployed” folder. Right click on the application and deploy. Navigate back to the Business Rules tab in the Planning application, where all of the rules should now be launchable:

Looking back at the Brokerage Commission form, the Ruleset that is attached is now displayed:

Note: This works most of the time, but sometimes following the above steps will not bring back all of the corrupted rules/rulesets. When this happens, I’ve found that the easiest solution is to:

  1. Take an LCM backup of Calc Manager in Shared Services
  2. Delete the rules that are corrupt
  3. Import the rules from the backup that was just taken
  4. Navigate to Calc Manager->Deployment View and Deploy all of the newly imported rules

This second option might take a little bit longer than the first solution outlined, but it will clean up your rules/rulesets and get them back to performing as expected.


This Isn’t Your Father’s Essbase Export

There are several ways to export data from Essbase on a large scale. Pulling it via Excel (Smart View or the Essbase Add-In) is not the best way to get large amounts of data when the goal is to move the data somewhere else, so this option will not be covered.

Database Export

The easiest method is to export all the data from a database by exporting the database.  This can be done in EAS.  This method is easy to automate with Maxl, but has little flexibility with formatting and the only option is to export all the data.  It can be exported in column format so the data can easily be loaded into another data repository.  If the data needs to be queried, or manipulated, this is a good option.  

Essbase Report Script

The classic way, prior to version 9, was to write a report script. This provides a tremendous amount of flexibility in formatting, but most admins struggle with this method, as it requires an in-depth knowledge of how data is most effectively queried.  If there isn’t a strong understanding, then extracting data is extremely slow.  Report scripts also offer the ability to export specific data, which is often required.

Calculation Script or Business Rule

Now, there is an alternate method that somewhat combines the best of the previous 2 methods.  A calculation script, or business rule, can now extract data in column format with a predefined column delimiter. It can filter the result to specific criteria, and doesn’t require the knowledge reports scripts does to make them efficient.

/* Export to text file */
DATAEXPORT "File" "delimiter" "fileName" "missingChar"
  
/* Export to relational database */
DATAEXPORT "DSN" "dsnName" "tableName" "userName" "password" 
  
When DATAEXPORT is used, there are a series of settings that can be applied.
  
SET DATAEXPORTOPTIONS
{
/* set the level of data to be extracted – same as a database export from EAS */
DataExportLevel ALL | LEVEL0 | INPUT;
  
/* Turning this on will export any member within the fix statement that is a dynamically calculated member that produces a value */
DataExportDynamicCalc ON | OFF;
  
/* A value between 0 and 16 – if no value is supplied, the number of decimals positions in the data, or the DataExportPrecision will be used */
DataExportDecimal n;
  
/* The number of positions numeric data is exported with, emphasizes data accuracy
NOTE: if DataExportDicimal is set, it will override this setting */
DataExportPrecision n;
  
/* When set to ON, every column will have a member name and they will be repeated from row to row */
DataExportColFormat ON | OFF;
  
/* Specifies the dense dimension used for columns – typically the months, or periods, are the most logical choice */
DataExportColHeader dimensionName;
  
/* When set to ON, the dimension names will preceed the data as column headers */
DataExportDimHeader ON | OFF;
  
/* When set to ON, data will be in column format and all members names will be repeated, and no column header will be included.  Missing and invalid data will be skipped producing successive dilimiters */
DataExportRelationalFile ON | OFF;
  
/* When set to ON, if the file specified already exists, it will be overwritten */
DataExportOverwriteFile ON | OFF;
  
/* When set to ON, the file exported will include additional details about the export
     - Summary of data export settings
    - Info, Warning, and Error messages
     - Exact number of blocks to be exported
     - Estimated time, excluding I/O time. */
DataExportDryRun ON | OFF;
};

Each method has its advantages.  I see the DATAEXPORT function becoming the primary export method because of its flexibility and ease of use.

A Word of Caution

When exporting data, always remember the population that has access to the export. Exporting data is a very popular method for backing up data, but often times it includes total company financials, employee salaries, and other sensitive data.


Is My Essbase Calculation Seeing Deja Vu All Over Again?

Everybody knows the quickest way from point A to point B is a straight line.  Everybody assumes that the path is traveled only one time – not back and forth, over and over again.  I see a lot of Essbase calculations and business rules, from experienced and novice developers, that go from point A to point B taking a straight line.  But, the calculation travels that line multiple times and is terribly inefficient.

Here is a simple example of a calculation.  Assume the Account dimension is dense, and the following members are all members in the Account dimension.  We will also assume there is a reason to store these values rather than making them dynamic calc member formulas.  Most of these are embedded in a FIX statement so the calculation only executes on the appropriate blocks.  To minimize confusion, this will not be added to the example.

Average Balance = (Beginning Balance  Ending Balance)  / 2;
Average Headcount = (Beginning Headcount   Ending Headcount) / 2;
Salaries = Average Headcount * Average Salaries;
Taxes = Gross Income * Tax Rate;

One of the staples of writing an effective calculation is to minimize the number of times a single block is opened, updated, and closed.  Think of a block as a spreadsheet, with accounts in the rows, and the periods in the columns.  If 100 spreadsheets had to be updated, the most efficient way to update them would be to open one, update the four accounts above, then save and close the spreadsheet (rather than opening/editing/closing each spreadsheet 4 different times for each account).

I will preface by stating the following can respond differently in different version.  The 11.1.x admin guide specifically states the following is not accurate.  Due to the inconsistencies I have experienced, I always play it safe and assume the following regardless of the version.

You might be surprised to know that the example above passes through every block four times.  First, it will pass through all the blocks and calculate Average Balance.  It will then go back and pass through the same blocks again, calculating Average Headcount.   This will occur two more times for Salaries and Taxes.  This is, theoretically, almost 4 times slower than passing through the blocks once.

The solution is very simple.  Simply place parenthesis around the calculations.

(
Average Balance = (Beginning Balance  Ending Balance)  / 2;
Average Headcount = (Beginning Headcount   Ending Headcount) / 2;
Salaries = Average Headcount * Average Salaries;
Taxes = Gross Income * Tax Rate;
)

This will force all four accounts to be calculated at the same time.  The block will be opened, all four accounts will be calculated and the block will be saved.

If you are new to this concept, you probably have done this without even knowing you were doing it.  When an IF statement is written, what follows the anchor?  An open parenthesis.  And, the ENDIF is followed by a close parenthesis.  There is your block!

"East"
(IF(@ISMBR("East"))
    "East" = "East" * 1.1;
ENDIF)

I have seen this very simple change drastically improve calculations.  Go back to a calculation that can use blocks and test it.  I bet you will be very pleased with the improvement.


Dynamically Referencing Members in Business Rules

Often times with a Hyperion Essbase or Planning application, an allocation of data will be required.  Many times, the allocation is simply moving data from one member to another.  When the number of members involved is large, developing the script can be time consuming.  When the members frequently change, the maintenance of the calculation can be a nuisance.

When the members involved in the allocation are similar on both sides (the from and the to), the following method can be employed to speed the development and limit, or eliminate, any maintenance required.

Requirement

The application has 50 members in which the data needs to be moved.  The data originates from an account coming from the general ledger.  The data needs to be moved to a new member that doesn’t exist in the chart of accounts.  The new member will exist in a different part of the hierarchy.

Solution

The first step is to create a corresponding member for each of the 50 accounts that need allocated.  These accounts will be identical to the original 50, except they will be prefixed with a “D” identifying them as a dummy, or made up, account.  Each of these new accounts will have a UDA of “allocation.”  The prefix of the member and the UDA are not critical.  They will likely be something more meaningful to the requirements.

GL Acct   Dummy Account
500345   D500345
500578   D500578
607878   D607878

Once the hierarchy is ready to handle the allocation, the following function can be used.  In layman’s terms, this only executes on the new members added (identified by the unique UDA) and makes them equal to the corresponding member without the added prefix.  We will assume that this is being executed on a scenario that equals “Actuals.”

FIX(@UDA(“allocation”))
/* Make the new member equal to the old member */
“Actuals” = @MEMBER ( @SUBSTRING ( @NAME(@CURRMBR(“Account”)) , 1));
/* Clear the old member */
@MEMBER ( @SUBSTRING ( @NAME(@CURRMBR(“Account”)) , 1)) = #Missing;
ENDFIX

Let’s assume that the UDA is NOT added to the new, or dummy, member.  If the UDA is on the originating member, the calculation would look like this.

FIX(@UDA(“allocation”))
/* Make the new member equal to the old member */
@MEMBER ( @CONCATENATE(“D”,@NAME(@CURRMBR(“Account”)))) = “Actuals”;
/* Clear the old member */
Actuals = #Missing;
ENDFIX

Now we can break down these functions. Remember, the calculations loop through all members in all dimensions.  In this example, setting the result equal to “Actuals” is simply making the account that the calculation is looking at, at that particular point in the loop, equal to whatever is on the other side of the equation.

@MEMBER ( @SUBSTRING ( @NAME(@CURRMBR(“Account”)) , 1))
There are four functions used in this string.

  • @MEMBER will convert a string to a member name
  • @SUBSTRING requires 2 parameters (3 optional).  The first is the larger string from which you want to take a smaller string.  The second is where to start, with 0 being the first character.  The third is how many characters to include.  If this is left blank, it will take all the characters to the right of the second parameter.
  • @NAME will convert a member to a string.
  • @CURRMBR gets the current member of a specified dimension.

Putting this all together, this calculation (from inside out) is getting the current member of the Accounts dimension (“d345678”).  It converts that member to a string.  It takes all the characters to the right of the first character (“345678”).  Then it converts the string back to a member.  At this point, we can set that member equal to something.

@MEMBER ( @CONCATENATE(“D”,@NAME(@CURRMBR(“Account”))))
The functions here are the same as above, except we are not removing the “d.”  We are adding it.

  • @CONCATENATE accepts two parameters and will combine those two in to one string

Putting this all together, this calculation (from inside out) is concatenating two strings, a “D” and the current member of the Accounts dimension (“d345678”).  It then converts the string to a member. At this point, we can set that member equal to something.

Benefits

By using these functions, the calculations can be much smaller, quicker to develop, and completely maintained by the outline.  This effectively gives the user community ownership on the maintenance.